


 Today was the day of rushed stamping and my first pop-up card. I'd seen a tutorial somewhere, but I can't remember where. My kids were supposed to be taking a nap, but they were noisy, disobedient, and I ended up changing one's diaper three times!! So I was rushed. I wish I had had more time to spend on
 the pop-up image, but these will have to do.
1. I started with the inside of
 the card with a sentiment, the cardstock measuring 3-3/4" x 8" and then I folded it in half.
2. Once it is folded, figure out how far from fold you want the pop-up image to stick out without interfering with your sentiment. I chose an inch, and even drew a pencil line on the back to help guide me.
3. Using your word window punch, slide the folded cardstock all the way into the punch, aligning with the pencil line and punch. Repeat on other side.

4. Now score between the rou
 nded holes and reverse the direction of the fold (from inward to outward) of the pop-up portion.
5. To adhere to the inside of the card, I folded the white cardstock and only put adhesive on one side. I slid it in the car
 d while mostly folded. Then I opened it up, applied adhesive to th
 e other side, and folded it closed and pressed down. (Otherwise it won't close because it fits too tight.)
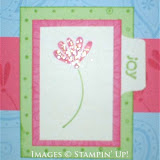
Decorate and embellish as usual. Sorry if this is scatter brained. My kids are driving me nuts right now. Early bedtime for
 sure!
sure!By the way, I used DP from the dollar store as well as dollar-store scrapbooking stickers to decorate my card. I was in a hurry, and sure enough, when I got my groove on finally, my kids started invading my stamping area.
Click here for an even cooler pop-up card tutorial.


2 comments:
Thanks for the tutorial - your card is wonderful!! Gonna have to give the pop up window thingy a try!
What cute cards! Love the images and the pop ups!
Post a Comment